Model captured in motion during an activewear fashion photoshoot
Uncategorized

How to Capture Movement in Activewear Photography

Activewear photography presents a unique challenge for fashion photographers. Unlike traditional fashion photography, where a model may hold a pose for several seconds, activewear is often designed to be seen in motion. Running, stretching, jumping, twisting, lifting, and even walking can change the way a garment looks and behaves.

The photographer’s job is to capture that movement while maintaining the visual polish and sophistication expected from fashion photography.

A great activewear photograph should make the viewer feel the movement. You should be able to look at the image and almost imagine the model running, stretching, or moving through space. At the same time, the clothing needs to remain clearly visible, flattering, and accurately represented.

For brands, this is particularly important. Activewear photography isn’t simply about showing what a garment looks like. It is about communicating performance, comfort, fit, flexibility, energy, and lifestyle.

Here are some of the most effective ways to capture movement in an activewear photoshoot.

Start With the Movement, Not the Pose

One of the most common mistakes in activewear photography is treating movement like a traditional fashion pose.

Instead of asking the model to “look like they’re running,” give them an actual movement to perform.

Ask the model to run toward the camera, jump, turn, stretch, lunge, reach, or walk through the set. Once the movement becomes genuine, the photographer can concentrate on finding the strongest moment.

This approach creates photographs that feel more natural.

A static pose can show the silhouette of a pair of leggings, but movement can communicate how those leggings behave when the body is actually moving.

The same applies to sports bras, jackets, shorts, tops, and other performance garments.

Before the shoot, identify the movements that make sense for the product and the brand. A running collection should have a different movement vocabulary from a yoga collection or a tennis collection.

Understand What the Garment Needs to Communicate

Before photographing movement, consider what the clothing is designed to do.

Is it compression apparel? Does the fabric stretch in multiple directions? Is the garment designed for running, yoga, training, cycling, tennis, or general lifestyle use?

The movement should reinforce the product’s purpose.

For example, a running garment might be photographed during a stride, with the model moving quickly through the frame. Yoga clothing may benefit from controlled stretches and extended poses. Training apparel could be photographed during squats, lunges, jumps, or other athletic movements.

The objective isn’t necessarily to photograph a literal demonstration of the product.

Instead, use movement as a visual language.

The viewer should understand the character of the clothing without needing an explanation.

Choose the Right Shutter Speed

Camera settings play an important role in capturing movement.

A fast shutter speed can freeze a model in midair or capture a running stride with remarkable clarity. Depending on the lighting and camera system, shutter speeds such as 1/500, 1/1000, or faster may be appropriate for particularly fast movement.

Freezing movement is especially effective when you want to show athleticism and physical energy.

A jumping photograph, for example, can become much more dramatic when the model is completely suspended in the air and every detail of the clothing remains sharp.

But freezing movement isn’t the only option.

A slower shutter speed can introduce controlled motion blur. This can create a sense of speed and energy, particularly in running or dance-inspired activewear campaigns.

The important distinction is between intentional motion blur and accidental camera shake.

If you use blur, make it part of the visual concept.

Use Strobes to Freeze Action

Studio strobes can be particularly effective for activewear photography.

Flash duration can freeze movement even when the model is moving quickly. This allows the photographer to capture dramatic athletic gestures while maintaining sharp detail.

This can be especially useful for jumping photographs.

A model can leap into the air, and the photograph can capture the exact moment when the body is suspended above the ground. The clothing remains crisp while the pose communicates energy and strength.

When working with strobes, however, the photographer needs to understand the relationship between shutter speed, flash duration, ambient light, and camera synchronization.

The goal is not simply to use a powerful flash.

The goal is to control the relationship between light and movement.

Photograph the Moment Before and After the Action

The obvious moment isn’t always the best photograph.

If a model jumps, the highest point of the jump may produce an impressive image. But photographs taken immediately before or after the jump can sometimes feel more natural.

The same is true of running.

A photograph of the model’s foot striking the ground may tell a different story from an image captured at the peak of the stride.

Don’t limit yourself to one frame.

Have the model repeat the movement several times and photograph the entire sequence.

Modern high-resolution cameras and fast continuous shooting make it possible to capture subtle differences between frames. Those differences can be crucial.

A hand position, facial expression, leg extension, or piece of fabric moving in the right direction can transform an ordinary photograph into a great one.

Give the Model Simple Directions

Models don’t necessarily need complicated instructions.

In fact, too much direction can make movement feel artificial.

Instead of describing an exact pose, give the model an action.

For example:

“Run toward me.”

“Take three steps and jump.”

“Turn and look back.”

“Walk past the camera and adjust your jacket.”

“Stretch your arms overhead.”

“Drop into a lunge and come back up.”

These instructions give the model something physical to do rather than something unnatural to imitate.

Once the model understands the movement, the photographer can adjust the direction, timing, and framing.

Photograph Movement in Sequences

Movement photography benefits from repetition.

Ask the model to perform the same action several times. Each repetition will be slightly different.

One frame might have the best body position. Another may have the best facial expression. A third may show the clothing moving beautifully.

Don’t assume the first attempt will be the best.

Athletes naturally repeat movements, and fashion models can do the same thing. The more comfortable the model becomes with the action, the more natural the photographs tend to become.

You can also vary one element at a time.

Change the speed.

Change the direction.

Change the distance from the camera.

Change the model’s starting position.

Small adjustments can produce dramatically different photographs.

Pay Attention to Fabric

One of the great advantages of movement in activewear photography is that it reveals fabric behavior.

A jacket lifting slightly during a turn can demonstrate lightness. A pair of leggings stretching during a lunge can communicate flexibility. A loose top moving during a run can create energy.

Fabric movement can become an important compositional element.

Watch for hems, straps, sleeves, and loose layers.

Sometimes the best photograph occurs when the garment moves slightly away from the body, revealing its shape and construction.

This is particularly useful for campaign photography because the image communicates the physical characteristics of the garment without requiring the viewer to read product copy.

Use Wind and Air Movement

Wind can add another dimension to activewear photography.

On location, natural wind can create movement in hair and clothing. In a studio, a fan can be used to create controlled airflow.

A jacket blowing slightly behind the model can make a static pose feel dynamic.

The key is subtlety.

Too much wind can make the photograph feel artificial or distract from the clothing. A small amount of movement can be enough to create energy.

This technique can work particularly well with lightweight jackets, loose tops, skirts, and other garments with fabric that responds visibly to air.

Think About the Background

Movement becomes easier to perceive when the background provides visual contrast.

A simple studio background can make the model and clothing the center of attention.

On location, architectural lines, streets, staircases, tracks, bridges, or natural landscapes can create a sense of direction.

For example, a model running along a path can create strong leading lines. A staircase can emphasize upward movement. A long architectural wall can provide a clean background against which the body moves.

The background should support the movement rather than compete with it.

Use Directional Composition

Movement photographs often benefit from leaving space in front of the model.

If a runner is moving toward the right side of the frame, placing the subject too close to the right edge can make the photograph feel cramped.

Leaving space in the direction of movement gives the viewer somewhere to imagine the subject going.

This is sometimes called “looking room” or “moving room.”

However, rules like this are not absolute.

A tightly cropped photograph with the model moving directly into the edge of the frame can create tension and energy.

The important thing is to make the composition intentional.

Shoot From Different Angles

Changing your camera position can dramatically alter the feeling of movement.

A low camera angle can make a jumping or running model appear powerful and athletic.

A higher angle can create a more graphic composition.

Shooting directly toward the model can emphasize forward movement.

Shooting from the side can emphasize the length of a stride.

Following the model can create a completely different relationship between subject and background.

Don’t stay in one position throughout the shoot.

Move around.

Try different focal lengths and distances.

A wide-angle lens used close to the model can exaggerate movement and create an immersive feeling. A longer lens can compress the background and isolate the subject.

Use Panning for Speed

Panning is another technique worth exploring.

Instead of keeping the camera completely stationary, follow the model as they move across the frame while using a relatively slow shutter speed.

The subject can remain relatively sharp while the background becomes blurred.

This technique creates an immediate sense of speed.

It can be especially effective for running, cycling, skating, and other fast-moving activewear campaigns.

Panning requires practice because timing is critical.

You may produce many imperfect frames before finding the photograph where the model is sharp enough and the background has the right amount of motion.

That’s part of the process.

Don’t Make Every Photograph Athletic

An activewear campaign doesn’t need every photograph to show extreme physical movement.

Some of the strongest images may be quiet.

A model standing after a workout, adjusting a shoe, drinking water, walking through a city, or stretching before an activity can provide important visual variety.

These moments make the campaign feel more like a lifestyle story.

A strong activewear shoot might include three different levels of movement:

Static: portraits and product-focused images.

Controlled: stretching, walking, preparation, and transitional moments.

Dynamic: running, jumping, athletic movement, and action.

Combining all three creates a more complete visual story.

Capture Expressions and Personality

Movement shouldn’t eliminate personality.

A technically perfect athletic photograph can still feel lifeless if the model’s expression doesn’t connect with the viewer.

Depending on the brand, the model might look focused, confident, relaxed, joyful, determined, or completely natural.

Not every image needs a smile.

The expression should support the brand’s identity.

For premium performance apparel, a focused expression may work better than a broad smile. For lifestyle-oriented activewear, relaxed and approachable expressions may be more appropriate.

The photographer needs to direct both the body and the emotion.

Use the Environment

Location can make movement feel authentic.

A city street can turn running into an urban lifestyle story.

A park can communicate outdoor fitness.

A beach can suggest wellness and leisure.

A gym can provide a literal performance environment.

An architectural studio can create something more editorial.

The environment doesn’t necessarily have to be an obvious athletic location.

Sometimes placing activewear in an unexpected fashion environment can make the campaign more distinctive.

This is particularly relevant for brands positioned between fashion and performance.

Capture Transitional Moments

Some of the most compelling photographs happen between actions.

A model adjusting a waistband before running.

Pulling on a jacket.

Tying a shoe.

Taking a breath.

Turning toward the camera.

Walking away after a movement.

These moments can feel much more authentic than carefully constructed poses.

They also provide useful photographs for social media and editorial layouts because they feel less like traditional product photography.

Plan for Multiple Uses

Before the shoot, determine where the photographs will appear.

Website banners require different compositions from Instagram posts. Paid advertising may require room for copy. Editorial layouts may need horizontal images. Social media may favor vertical compositions.

If the client needs both horizontal and vertical photographs, plan for both during the shoot.

The same movement can often be photographed in multiple compositions.

This increases the value of the production and gives the brand more flexibility when creating its campaign.

Don’t Sacrifice the Clothing for the Movement

Movement should enhance the clothing—not hide it.

This is one of the most important principles in activewear photography.

A spectacular jump isn’t useful if the model’s body position completely obscures the garment.

A dramatic running photograph isn’t successful if the jacket is twisted in a way that makes it impossible to see.

The photographer needs to balance energy with product visibility.

Before each movement, think about what part of the garment needs to remain visible.

The brand invested in the clothing, and the photography needs to sell it.

Use Movement to Create a Visual Identity

Over time, a brand can develop its own approach to movement.

One company might use crisp, frozen athletic photographs.

Another might use subtle motion blur.

Another might emphasize graceful movement and minimalism.

Another might create highly energetic, almost cinematic imagery.

The technique becomes part of the brand’s visual identity.

This is why activewear photography shouldn’t simply imitate whatever is currently popular. The photographer and brand should work together to develop a visual language that feels distinctive.

Final Thoughts

Capturing movement in activewear photography requires more than a fast shutter speed.

It requires understanding the clothing, the model, the brand, the lighting, the environment, and the story the photographs need to tell.

The best movement photographs feel effortless. The model looks natural, the clothing is clearly visible, the lighting is intentional, and the composition makes the viewer feel the energy of the moment.

Whether you’re photographing a runner crossing a city street, an athlete jumping in a studio, or a model stretching in a quiet editorial setting, movement gives activewear photography something that traditional fashion imagery sometimes lacks: a sense of life.

When movement is captured successfully, the photograph does more than show the clothing.

It communicates what the clothing feels like to wear.

And for an activewear brand, that can be one of the most powerful things a photograph can do.

Model Lauren by Eric Hason
Standard
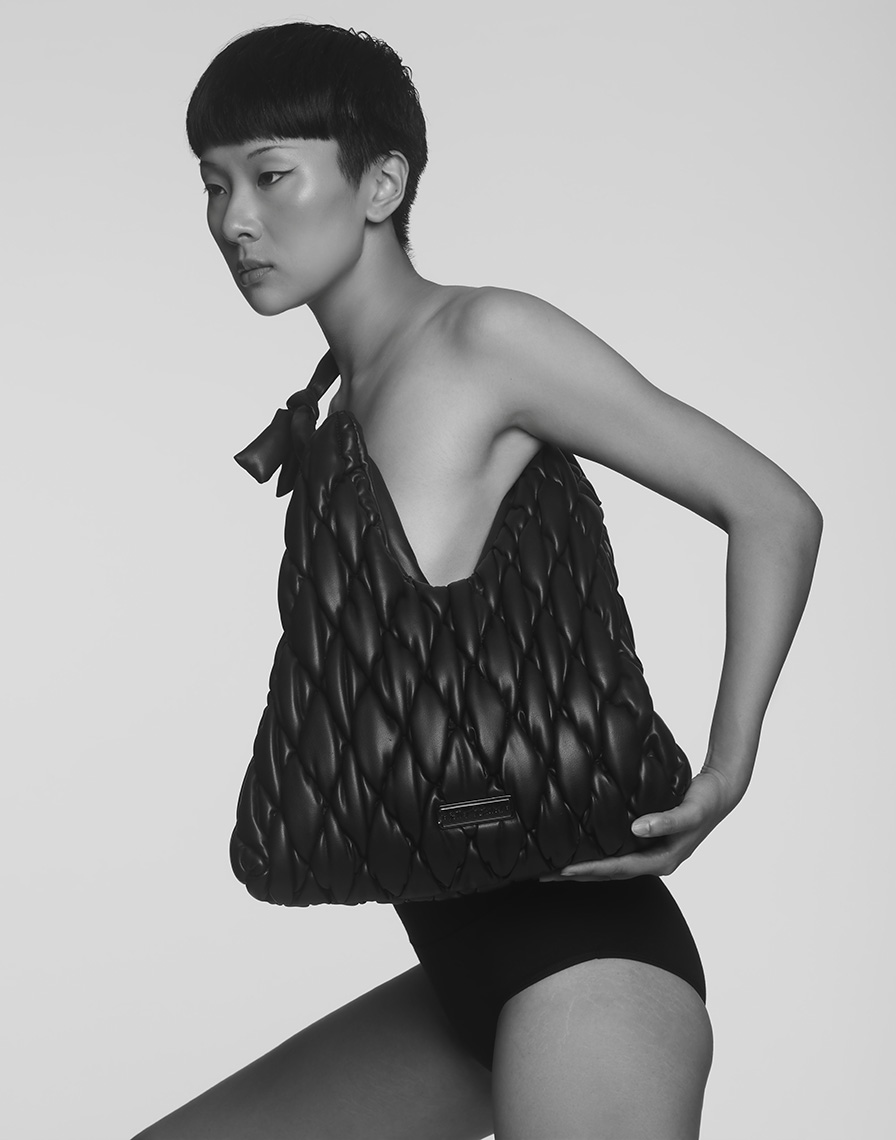
Black quilted handbag photographed on a model for a fashion accessories campaign in New York City
Uncategorized

How to Photograph Handbags for Fashion Brands | NYC Handbag Photographer

How to Photograph Handbags for Fashion Brands: From Product Photography to Editorial Images

For a fashion brand, a handbag needs to be photographed in more ways than simply placing it against a white background. A strong handbag photography campaign should show the product accurately while also communicating the personality, style, and lifestyle of the brand.

Handbag photography can include clean e-commerce product images, photographs of the bag on a model, close-up detail shots, editorial images, campaign photography, and social media content. Each serves a different purpose, but together they create a complete visual identity for the collection.

As a New York City fashion and beauty photographer, I approach handbag photography as a combination of product photography and fashion photography. The goal isn’t simply to document the bag. It’s to create images that make people want to see it, wear it, and ultimately buy it.

Why Great Handbag Photography Matters

A handbag is a highly visual product.

Customers may notice the silhouette, leather, color, hardware, stitching, quilting, handles, or unusual construction before they know anything else about the product. Photography therefore plays an important role in how they perceive its quality and value.

For an emerging fashion brand, the photography may be one of the first things a potential customer encounters.

A beautifully designed handbag can look inexpensive if it is poorly photographed. Conversely, carefully considered lighting, styling, composition, and retouching can communicate craftsmanship and luxury.

This is why handbag photography for fashion brands requires more than technical product photography.

The images need to accurately represent the product, but they also need to express the brand.

Product Photography vs. Editorial Handbag Photography

One of the first decisions a brand should make is understanding the difference between product photography and editorial photography.

Product Photography

Product photography is primarily about information.

The customer needs to see the handbag clearly. The photograph should show its shape, proportions, color, construction, and important details.

Typical product images might include:

  • Front view
  • Back view
  • Side view
  • Interior
  • Bottom
  • Hardware
  • Handles
  • Strap
  • Closure
  • Detail shots

These images are especially important for an e-commerce website or product detail page.

The background is often simple and the lighting relatively controlled. The objective is consistency across the entire collection.

Editorial Photography

Editorial photography has a different purpose.

It is about creating an emotional response.

The handbag might be photographed on a model, in an interesting environment, or within a carefully styled fashion story. The lighting and composition can be more expressive.

Editorial images don’t necessarily need to show every product detail.

Instead, they communicate the world of the brand.

A customer should be able to look at the photograph and understand something about the person who might carry the bag.

The most effective handbag campaigns often combine both approaches.

Start With the Design of the Handbag

Before deciding how to photograph a handbag, I want to understand what makes that particular product interesting.

Every handbag has characteristics that should influence the photography.

Is the silhouette architectural?

Is the leather soft and supple?

Does it have distinctive quilting?

Is the hardware an important design feature?

Does the bag have an unusual handle?

Is the strap intended to be worn across the body?

Is it oversized?

Is it a small evening bag?

Is the interior particularly important?

These questions help determine how the product should be photographed.

A highly structured bag might benefit from directional lighting that emphasizes its geometry. A soft leather bag may look better with softer illumination that reveals its folds and texture.

The photography should respond to the design rather than forcing every product into the same visual formula.

Lighting Handbags to Show Shape and Material

Lighting is one of the most important aspects of handbag photography.

A handbag is a three-dimensional object, and the lighting needs to communicate that dimension.

Flat lighting can eliminate shadows and make a product easy to see, but it can also make a beautiful material appear flat.

Controlled directional lighting can create highlights and shadows that reveal the shape of the handbag.

Leather is particularly interesting because it responds strongly to light.

A glossy leather surface can produce attractive highlights, but uncontrolled reflections can also become distracting. Matte leather, suede, nylon, woven materials, and textured fabrics all react differently.

The photographer needs to understand the surface and adjust the lighting accordingly.

The objective isn’t simply to make the handbag bright.

The objective is to make the material look like the material it actually is.

Good handbag photography should allow the viewer to almost feel the leather through the photograph.

Photographing Handbags on a Model

Once the basic product photographs have been created, photographing the handbag on a model introduces an entirely different dimension.

The model provides scale.

A viewer can immediately understand how large the handbag is and how it sits against the body.

The model also provides movement and personality.

A shoulder bag can be photographed naturally while walking. A large tote can be carried against the body. A smaller bag can become part of an evening look.

The model’s pose should support the product.

Hands, arms, shoulders, and body position can all be used compositionally to direct attention toward the handbag.

The photograph accompanying this article is an example of this approach. The model’s arm creates a strong diagonal line through the composition while her hand supports the bottom of the bag. The pose communicates the size and shape of the handbag while remaining visually fashion-oriented.

The photograph isn’t simply showing someone holding a bag.

It is creating an image around the bag.

Styling the Handbag

Styling is an important part of fashion accessory photography.

The clothing should complement the handbag without competing with it.

This doesn’t necessarily mean that the clothes need to be simple.

Contrast can be extremely effective.

A structured handbag might look great with soft, flowing clothing. A highly textured bag might be photographed against a clean, minimal outfit. A colorful handbag could become the central color element within an otherwise restrained styling concept.

The styling should reflect the brand’s customer.

Luxury handbag photography may require a sophisticated, minimal approach. A contemporary streetwear brand may benefit from something more energetic. A designer collection might call for a highly conceptual editorial treatment.

There is no universal formula.

The important thing is that the handbag, model, clothing, and environment feel as though they belong to the same visual world.

Showing the Details

A campaign shouldn’t rely entirely on wide or full-body photographs.

Close-up images are extremely valuable.

A tight photograph can reveal:

  • Leather grain
  • Stitching
  • Quilting
  • Zippers
  • Clasps
  • Buckles
  • Logos
  • Embossing
  • Handles
  • Hardware
  • Interior construction

These details help communicate craftsmanship.

They are particularly important for premium and luxury accessories, where construction and materials are part of the value proposition.

A close-up can also become a useful piece of social media content.

One handbag shoot can therefore generate a variety of images rather than a single hero photograph.

Creating a Consistent Collection

When photographing an entire handbag collection, consistency becomes extremely important.

The photographs should feel as though they belong together.

That means maintaining consistency in:

  • Lighting
  • Background
  • Camera angle
  • Cropping
  • Color
  • Styling
  • Model direction
  • Retouching

If one handbag is photographed with soft light and another with extremely dramatic light, the collection may feel disconnected.

This doesn’t mean every photograph needs to be identical.

There should be enough consistency that the brand’s visual identity remains recognizable while allowing individual products to have their own personality.

This is particularly important for e-commerce.

Customers should be able to move from one product page to another and feel that they are looking at the same brand.

The Importance of Color

Color can completely change how a handbag is perceived.

Black handbags require careful lighting because dark surfaces can easily lose detail. White and pale handbags require attention to highlight control. Bright colors need accurate color reproduction.

Color management is therefore an important part of professional handbag photography.

But color isn’t only a technical consideration.

It is also a branding decision.

A brand might want neutral, understated imagery, or it might want saturated colors and strong contrast.

The photographer needs to understand both the product’s actual color and the brand’s desired visual language.

Black-and-White Handbag Photography

Not every handbag photograph needs to be in color.

Black and white can be especially effective for editorial campaigns where shape, texture, lighting, and composition are more important than color.

In the accompanying photograph, the monochrome treatment emphasizes the sculptural quality of the quilted handbag. The absence of color directs attention toward the relationship between the model, the bag, the highlights, and the shadows.

Black and white can also make an accessory photograph feel more timeless and editorial.

It isn’t necessarily the best choice for an e-commerce product page, where accurate color representation is important. But as part of a fashion campaign, it can provide another visual dimension.

Photographing the Bag in Context

A handbag doesn’t exist in isolation.

It belongs to a particular lifestyle.

This is why location photography can be so powerful for accessories.

A handbag might be photographed:

  • On the street
  • In a hotel
  • In a restaurant
  • In an apartment
  • In an architectural environment
  • In a studio
  • At an event
  • In a city environment

The location can tell the viewer something about the brand.

A minimalist studio can make the handbag feel sophisticated and sculptural. A city environment can communicate energy and contemporary fashion. An elegant interior can suggest luxury.

The important thing is that the environment supports the product rather than distracting from it.

Creating Images for Social Media

Today’s handbag photography also needs to work across multiple platforms.

A campaign photograph might appear on a website, Instagram, Pinterest, digital advertising, email marketing, or a retailer’s website.

That means it’s useful to photograph with different crops and orientations in mind.

Vertical images can work particularly well for social platforms and mobile viewing.

Horizontal photographs may be useful for website banners.

Tighter crops can become social media posts or advertisements.

Detail photographs can provide additional content between major campaign images.

Thinking about these applications before the shoot can significantly increase the value of the photography.

E-Commerce and Campaign Photography Should Work Together

One of the most efficient approaches for a fashion brand is to plan e-commerce and campaign photography as part of the same production.

The clean product photographs provide the information customers need.

The campaign photographs provide the emotional connection.

The editorial images create brand identity.

The detail photographs communicate craftsmanship.

Together, they create a complete visual system.

Rather than treating each photograph as a separate assignment, the photographer can plan a shoot that produces a wide range of usable content.

This can be particularly valuable for emerging brands working with limited production budgets.

Retouching Handbag Photography

Retouching should enhance the photograph without making the product misleading.

For handbags, that can mean removing dust, small imperfections, distracting reflections, or temporary marks created during production.

The goal should be to maintain the real character of the product.

Over-retouching can make leather look artificial.

Texture can disappear.

Natural highlights can become unnatural.

For fashion photography, I generally prefer retouching that feels polished but believable.

The viewer should see the craftsmanship of the product rather than the retouching.

Planning a Handbag Photography Shoot

A successful handbag photography shoot begins well before the camera is set up.

The photographer and brand should discuss:

What is the objective?

Is the shoot primarily for e-commerce, a new campaign, advertising, social media, or all of these?

What products need to be photographed?

How many handbags are involved?

What images are required?

Are front, back, detail, model, editorial, and lifestyle images needed?

Where will the photographs be used?

Website, advertising, social media, print, lookbook, or retail?

What is the visual direction?

Minimal, luxurious, contemporary, experimental, classic, or editorial?

Answering these questions early helps prevent a shoot from becoming a collection of disconnected photographs.

What Makes a Successful Handbag Photograph?

Ultimately, successful handbag photography has to accomplish several things at once.

It needs to show the product accurately.

It needs to make the material look appealing.

It needs to establish scale.

It needs to communicate the brand.

It needs to attract attention.

And, most importantly, it needs to make the viewer want the product.

That last part is easy to overlook.

Photography isn’t merely documentation. For a fashion brand, it is part of the sales process and part of the brand identity.

A customer may never touch the handbag before purchasing it. The photograph has to communicate some of that experience.

What does the leather look like?

How large is the bag?

How does it sit on the body?

What does it feel like to carry?

What kind of person carries it?

What does owning it say about the customer?

The strongest photography begins answering those questions without ever having to state them.

Final Thoughts

Great handbag photography requires an understanding of both the product and fashion.

A handbag needs to be photographed accurately, but it also needs to exist within a visual world.

That’s why I believe the best approach combines product photography, model photography, editorial photography, and lifestyle imagery.

The clean product photograph tells the customer what the handbag looks like.

The model photograph shows how it is worn.

The detail photograph communicates craftsmanship.

The editorial photograph communicates desire.

And the campaign as a whole communicates the identity of the brand.

For fashion and accessories companies, the goal shouldn’t simply be to produce photographs of handbags.

The goal should be to create a visual language that makes the handbags recognizable, desirable, and memorable.

That is what professional handbag photography can do for a fashion brand.

Standard